 The Before...
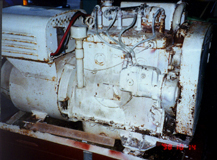
Mike Wolfe Chapter Ten "The River Queen Refit" 2005
|
This was a tough one but it turned out well!
|
|
Powered
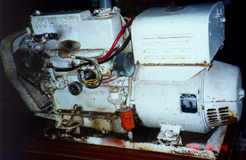
by KOHLER electric plant Model 6.5A23 (50226D7) Ser# 312398 Kohler Controller # C-245479 KW 6.5 / cycles 60 Volts 120 / RPM 1800 AMP/TERM 54.2 / Batt volts 12 |
It looked in real bad shape. Someone had tried to work on it once and stopped. Unfinished and missing parts. It needed some care before any chance of ever starting again. |
The Before...
KOHLER electric plant sub-project...
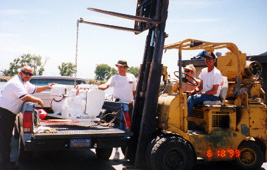
That's all I need, another project, right? Well, this one needed to be. So while we were still in haul-out some time before splash-down. I elected to pluck what I call #3 engine (KOHLER genset) out of it's nice and roomy space between #1 and #2. This also gives us much more room to work on the bilge surface as well as freedom when working on 1&2. Here's my game plan: With the onset of winter I like to have a project to work on the bench out in the garage and it looks like I found one. So with no help from me one weekday, Pat and Doug hoisted it up and out with the use of a big forklift using a long boom. With thanks and beers we got it in the back of my truck soon to be set on a platform at home for disassembly. I took more pictures of the whole event but can't find the roll to send for development. I'm sure it will turn up.
Disassembly was challenging and difficult...Okay, it was fun and and educational! My only prior experience of an engine rebuild consists of 2 or 3 small Briggs & Stratton engines and 1 Kawasaki 550 jetski. As the weeks went by, the tear-down process continued. Any place that contained oil, gas, water, coolant, and air needed to be cleaned and resurfaced with a wire wheel. I guess that would be pretty much the whole thing. Some of the more rusty parts I took over to the prop shop and bead-blasted. Wow, what a difference that thing makes! Some stuff cleans up like brand-new.
I found a company in San Francisco where I can still get parts. (H.G. Makelin 800-471-0590) One gasket kit, a book and four new spark plugs. Special thanks to Darryl, Carl and Pat. Who at different times helped me muscle that heavy sucker around and had to borrow some tools I needed. Now and then you pick up a good tip or trick and this one came from Pat. When in the reassemble stage, parts that need good lubrication I used a common household cooking product called "PAM" Spray it on the cam, valves, and crank. Sounds crazy 'til you think of it. Clean high heat oil from a spray can! It worked very well indeed.
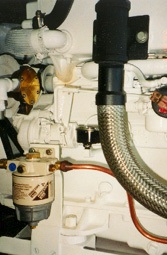
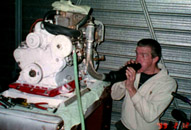 Patrick: Testing for
leaks.
Patrick: Testing for
leaks.
Reassembly went pretty fast and took the better part of two weeks working after hours. Most all of the internal parts were in very good shape. There was no scoring or lapping on the cylinder walls and the pistons looked good as well. Just about all the pro-type people I talked to said I would need to replace the piston rings or suffer the consequences. It would be a shame to take it down this far just to put bad parts in it and have a smoking and/or a compression problem down the road. I'm no pro but I felt that the rings looked in great shape! They looked new in fact! So due to budget restraints I elected to use the old and hope for the best. As a matter of fact during the tear-down and reconditioning process we could detect the traces of some one's past handiwork. (Must have been a plumber) Patrick and I came to the conclusion that at one time this unit had ran good but something had gone wrong? A cracked exhaust manifold we think due to the shit weld job on the existing manifold. This allowed water to leak back through the exhaust path and into the cylinders. This person then attempted a rebuild in place and ended up putting stuff back together wrong. When they could not get it to run they just quit and it just sat. For a long time by the looks of it.
One of
the last things to bolt on was the magneto. We (Pat and I)
followed the book but were having trouble getting the timing
right. Once we closed the book and got a timing light from my
dad, (remember using a timing light?) we got her dialed in and
she was snapping good and strong at the plugs and right on the
money on the timing mark. The only other thing I had to fix/make
was a new exhaust manifold. Man, I could go long in text on this
one but a picture tells a thousand truths on just how nice this
one turned out. It was time to fire it up!
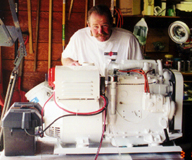
She purred like a kitten. Pat was so glad! Now we can paint it.
This guy loves to paint. It's his real forte. He had some
leftover milspec aircraft paint. 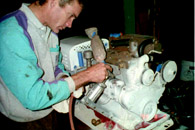
Goes on looking wet and stays that way! After two coats she looked brand new. "Showroom" new.
 Not bad for a 1969!
I plan to drop her back in soon as I finish scraping and cleaning and painting the bilge where it goes.
 After...
We ended up lifting the whole boat out to fix the reverse locks on the outdrives, but we did not place it up on blocks. Just left it in the slings for an hour or so. Both sides kept popping out and up when trying to stop or manuever. This can be a very bad thing! But, as long as we were out we used a fork lift to drop the genset in. It took me a day or so to get it all hooked up and running proper. She has been running proper for a total of 20 or so hrs now and seems a-ok.

Many thanks to Doug and Patrick, Deryl and Carl! All these great guys played a big part in the Taking out, Tearing down, figuring out, rebuilding, figuring out, fine tuning, figuring out, and puting it back in! May they all " Live Long and Prosper" \\V//.
Back to the main River Queen Refit page.