On the hull, any spot that was in question of being too thin or holed too big I had a patch of 10ga.steel welded in place. In some of the not-too-badly-pitted spots I used Marine Tex epoxy putty to fill them in.
Mike Wolfe Chapter Eight "The River Queen Refit" 2005
Skin Job...
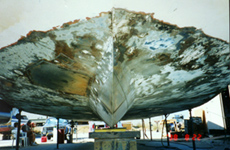
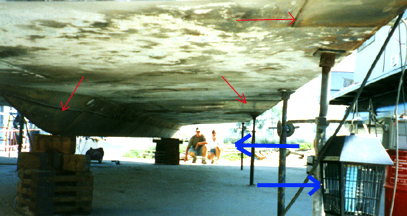
While hauled out for 6 months, we worked our asses off on the primary system of all boats. The hull. And this hull needed alot of help! As with most River Queens (I'm told), the keel as well as many other spots was rusting from the inside out. While trying to place this boat on blocks she crushed through in more than one spot. A complete keel cap was needed and was put in place by the capable hands Ed Garcia and son.(Professional welders) (See red arrow left)
On the hull, any spot that was in question of being too thin or holed too big I had a patch of 10ga.steel welded in place. In some of the not-too-badly-pitted spots I used Marine Tex epoxy putty to fill them in. |
|
First, I sandblasted clean the holes and dips on the surface of the metal with my trusty dusty Sears light duty sand blaster.(Big job, have spare tips!) In the pictures below and above you can see a new keel cap and the plating over of the worst spots.(Red) And my fly killers in blue.
I used "Coal Tar" epoxy on the wetted surface. Below the waterline. (my cost - $50/gal) A two part black tar paint on the bottom as well as inside along the keel. It's not a anti-fouling paint and stuff grows on it pretty fast. But all who use it rave of long-term durability on steel. It goes on thick and smells of tar and even burns skin! Some people go with one coat but I went with two, three in some places as well as on my newly rebuilt out drives.
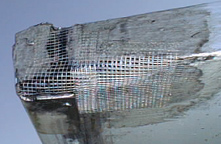
| Top side I pick and scrape, wire brush then use the converter to a black finish. In places where I'm lucky enough to find a hole, (sometimes a big-ass hole!) I use a sheetrock hole-patching screen dispensed from a 6" roll. It has a small polysomthing mesh with a sticky side. You cut enough to cover the hole and then some. You can even mold or form rusted away round corners or cracks. |
The dark part behind the screen is in fact a big-ass hole. |
Then, I go back and give it another coat or two of rust converter, locking down the screen. Pop all the bubbles in the screen by blowing on it. This is necessary so the marine Tex will penetrate the patch. Let set for 24 hrs. Apply the Marine Tex liberally. Be sure to push enough through the patch into the hole to give some support when dry. Even better, if you can get to the backside of the hole do the screening there and let it set. Then add more to the side that shows. Let stand 24 hours more. I then use a sanding disk (#80) on a "L" grinder to shape or flatten the patch. If you're lucky or if you're good at it, you can add just the right amount so as not to have to add too many additional amounts of rather expensive stuff.
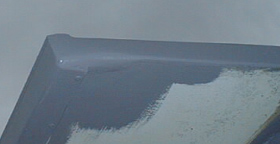
Once painted you cant even see where the holes were! |
Once satisfied with the flatness I use oil based "Rustoleum" gray primer and sand with an orbital sander using a finer grit to the desired finish. Then more gray primer 'til the whole field or section I'm working on is finished flat and smooth to my liking. Hole fixed! |
Now for the topcoat or finished painted surface above the waterline. I have a theory I have yet to prove and what I plan to do to my boat as a course of action. We have a steel boat. What does a steel boat do? RUST! It's a fact of life and for as long as we have a steel boat we will be chasing down rust spots. This gives to the problem of paint not matching in spots all over the boat. I figure, if I stick to the same brand primer as well as the same brand of oil-based paint and color for the topcoat it should help with the mis-matched spots. I have a feeling that with a boat as large as my own it will be more like the Golden Gate bridge. By the time I get to one end it will be time to start back over again! Another tip - never leave bare shiny steel open to the elements overnight. Well, you can in the dry summer maybe. But the rust comes a-callin' fast! The cost of a can of spray-on primer versus the time and aggravation to re-surface and remove the rust is worth it. For now I plan to patch as I go along using the gray primer first then going to a white primer over all. Then adding color to the trim later...
Maybe one day I'll try to paint the whole boat at once but not for some time to come...